A big part of effectively managing vacation rentals is communication with the guest, even after the booking has been made. Updating the guest with information about the property and surrounding area after they book but before they arrive makes for a much smoother experience. There are innumerable other emails that are useful, such as pre-departure instructions, after departure review requests, booking updates to housekeepers, etc.
OwnerRez accomplishes all of these scenarios with email templates (to define what to send in the email) and triggers (to define when it goes out). Custom fields are used to define and mail merge in per-property information if you have more than one property. Here's a video overview.
In this article, I'm going to show you how to write an email that goes out 7 days before arrival with a property lock code and directions. I'll be using a sample account with two properties -- Stoney Peak and River Glen.
Custom field definition:
First, create custom field definitions, one for the lock code and one for the directions. Make sure to select type of Property, (not Booking). This will allow you to populate information for each property. Once a custom field is created, you can reference it in any email template which will mail merge in the correct value.
If you have only one property, you can skip over the custom field definition step and go straight to the steps on creating a custom booking template and a trigger to send it. In your situation with a single property, you don't need to put different things in emails for different properties.
If you've got multiple properties, custom fields are the key to being able to simplify your workflow. A custom field is like a certain shaped bucket, where each property can have a different value for that field. In the email you reference the field name, and then that field name is replaced with the value you set per property. That's a mouthful, but keep going -- it'll become clear soon!
- Create custom fields in the Settings > Custom Fields section
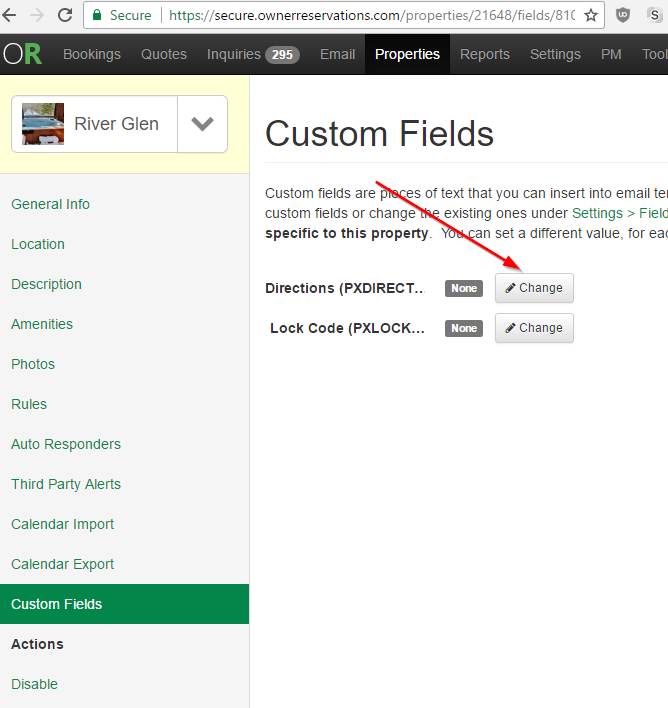
- Go to each property and look in the Custom Fields section of that property. There you'll see a list of all fields you have created and set the value differently for each property
- Reference the custom field in your email template. It'll look at the property on the booking and pick the correct value that you have defined on the property.
Lock Code:

Directions:
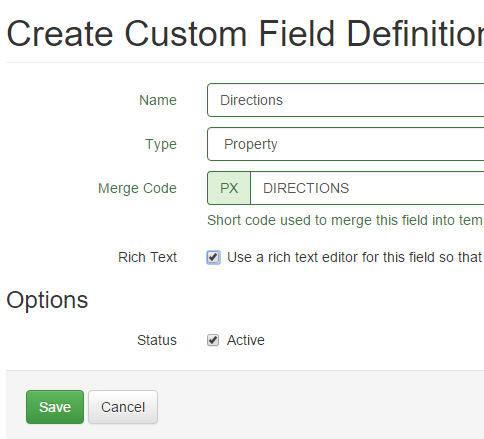
(notice we mark rich text here so we can put formatting into the values)
Email Template:
Customized email message templates created by OwnerRez users will only be sent automatically if the email message template has a corresponding trigger set.
Next, create a booking email template and use the Insert Field button to see a list of all available fields:


Reference the field codes:

Write a friendly email using the custom field definition codes, as well as other standard codes:

Look at the preview...

Oops, field code data isn't coming through yet because we didn't define values on the property. To define values, you will go to each property in turn. Go to the Custom Fields tab on each property. Use the change button to set the values:
I've got two properties in this example, so I've set one set of values for Stoney Peak:
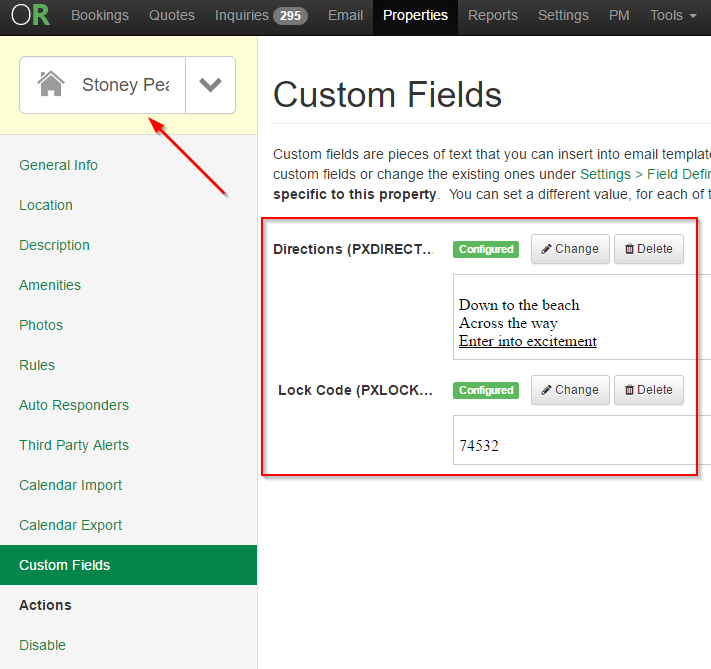
And a different set of values for River Glen:

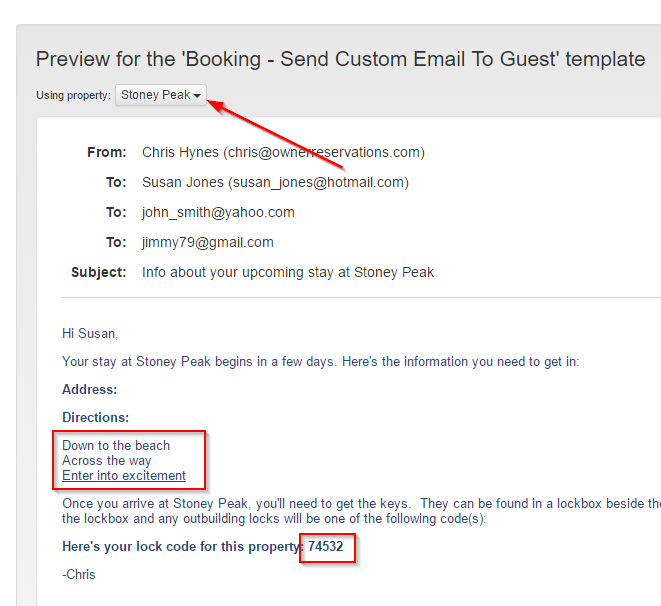
Check the preview again...

There we go -- gorgeous! And if we use the property selector at the top of the preview to see what the same template will look like for a different property, we see that the values for the custom fields are updated with the value we set on the other property:
Trigger:
Now we've got an email template set up and values merging in from the property, but we need to hook it up to automatically send.
To do this, create a trigger to send the template 7 days before arrival:
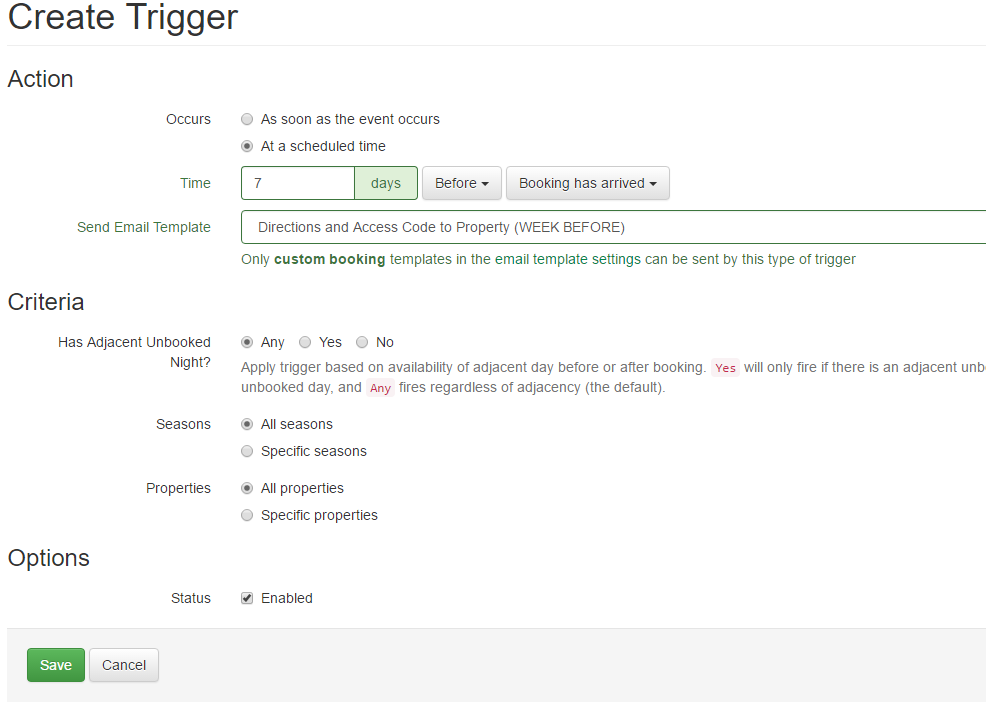
Now we're good to go. We've got a pre-arrival email template with information merged in from the booking property, and a trigger that sends out the email 7 days before arrival.
Let's go look at a booking and see where the triggered email shows up. There it is, on the Emails tab, under "Automatic Emails". You can use the buttons next to it to send it immediately or skip sending that email for this booking.

You can also use the Add Scheduled Email button at the bottom to manually schedule a template for a booking (rather than having it automatically scheduled using a trigger).
You can see a complete list of upcoming emails scheduled to be sent by Triggers, with the Trigger Forecaster. This is found under Settings > Triggers > the button on the right side above the grid.

This will show a huge grid of all upcoming messages and you can see if/when/where they will send - and if they won't, why.
You can also batch > skip ones you don't want going out.
Note: The Trigger Forecaster does not show System Messages that are scheduled for the future. There is currently no display for that.