When you start a hosted website, we give you a test location on our hosted OwnerRez domain. When you're ready to go live, you'll link up your own domain name to the OwnerRez servers and from then on the hosted website will "live" at your domain and typing in that domain will take you directly to your OwnerRez hosted website.
We'll also generate an HTTPS secured certificate and apply it for you at no additional charge. This may take a few hours, or even overnight after you follow the steps below to configure the DNS.
Configuration
We made a quick video that shows the Going Live process, so watch this first before looking at the steps below:
If GoDaddy is your domain registrar, we have a specific video for you:
If Google Domains is your domain registrar, we have a specific video for you:
To go live with your hosted website, you'll need to do three things:
- Buy a domain name. If you don't have an account anywhere yet, we recommend Namecheap.
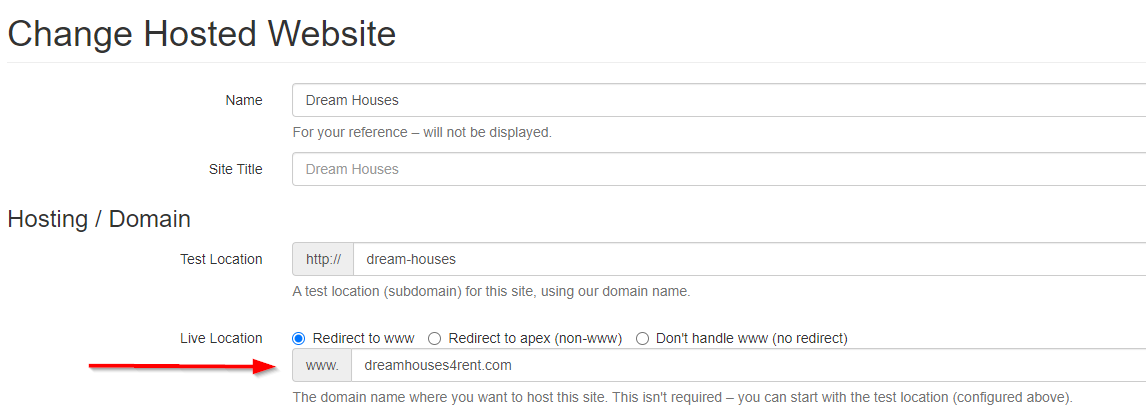
- Enter your domain name in the "Live Location" box in the Hosting/Mapping section of your hosted website settings. This is found in Settings > Hosted Websites > Select the Name of Your Website > Click on "Change Settings" button at the top. On the next page, enter the domain name:
- Update your DNS servers to point to hosted.ownerrez.com as a CNAME and/or our static IP addresses (see below).
Step three is the tricky part. The easiest thing to do is to contact support at your registrar, the place where you purchased your domain, and ask them to turn off any domain parking/forwarding and make the following changes for you:
- Remove any A type records with a host name of "@".
- Add 3 new A type records with the host name "@", one for each IP address below:
- 52.201.23.5
- 52.86.46.114
- 34.235.235.52
- Create (or set if there is one already) a CNAME type record with a host name of "www" pointing to hosted.ownerrez.com
- If there are any AAAA type records with a host name of "@", delete them. This is rare.
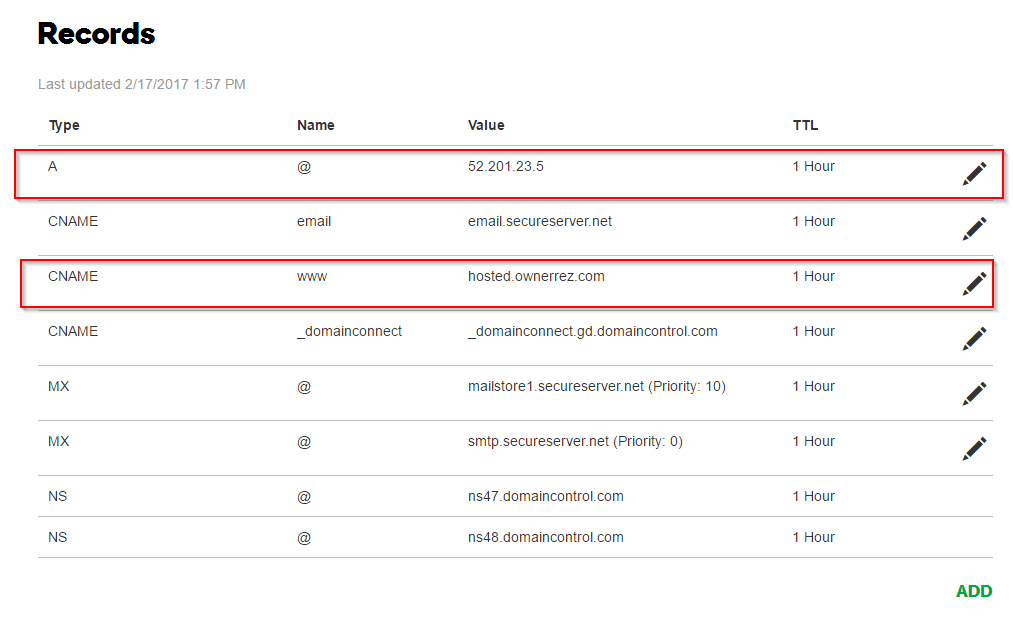
Here is an example of how this would be configured in Namecheap advanced DNS:
Subdomain configuration
If you are configuring a subdomain (e.g. your-subdomain.yoursite.com), then the steps are slightly different:
Please note: "your-subdomain" is just a placeholder here for whatever your subdomain should be.
- Create (or set if there is one already) a CNAME type record with a host name of "your-subdomain" pointing to hosted.ownerrez.com
- If desired, create (or set if there is one already) a CNAME type record with a host name of "www.your-subdomain" pointing to hosted.ownerrez.com
SSL Certificate
An SSL (Secure Sockets Layer) certificate is a digital certificate that verifies the identity of a website and enables an encrypted connection between a web server and a web browser. Once installed on a web server, it activates the padlock and the https protocol, thereby allowing secure connections between a web server and a browser. SSL certificates help to secure online transactions and ensure that customer information is kept private and secure.
When guests see the padlock icon next to your OwnerRez website URL, it means their credit card transactions are protected by SSL technology.
OwnerRez provides a free HTTPS secured SSL certificate, applied on your behalf. This may take a few hours, or even overnight after you follow the steps below to configure the DNS.
Pitfalls and Gotchas
Do I need to configure Nameservers? No, you do NOT need to point nameservers at the IP addresses above. That is a separate configuration. You should make the updates to the DNS on your current nameserver, usually the one provided by your registrar.
If you have a custom nameserver set at your registrar, like Wix and other sites use, you can either add the records to their nameserver or if you're not using that anymore, switch back to your registrars nameservers.
If you're confused on this, contact support at your registrar -- they'll be able to help you get your nameserver configuration correct and apply the DNS settings above. You can point their support agents at this web page - they will know what it means and how to make it so. (Using the Chat feature with your registrar is often a good option. Just copy and paste all of the info from #3 above into the Chat session and the folks at Namecheap, GoDaddy, etc. can usually get you set up in no time.)
Self-Configuration
If you want to do the DNS configuration yourself, you'll need to go into the "Manage DNS" section for your domain name registrar (the place where you bought the domain name). It might be named slightly differently depending on where you bought the domain, but it probably says something about DNS.
Once you're there, you'll need to add DNS records for the @ and www hosts as outlined above. If there are existing records for @ and www, delete them. If there are records for other hosts, you can leave those.
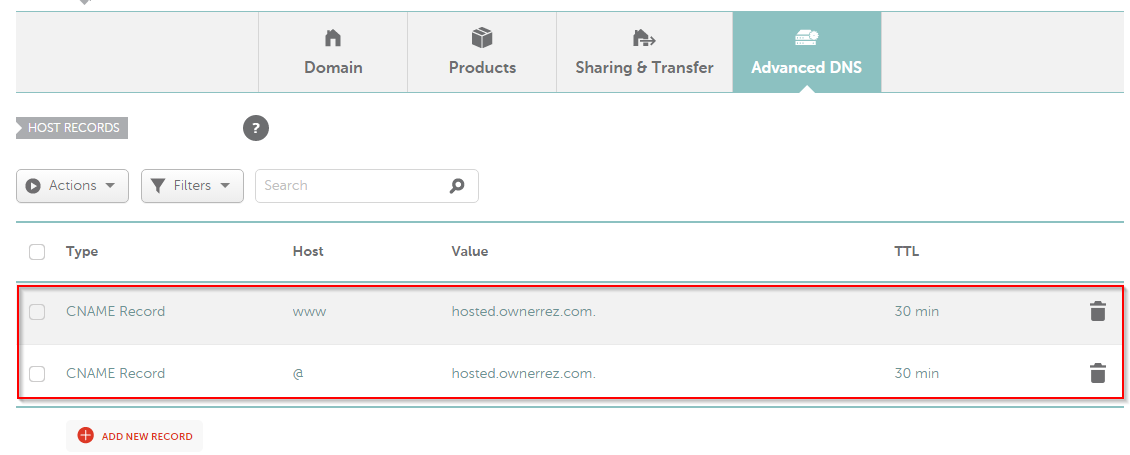
It'll look something like this (GoDaddy):
(This example domain also has some other extra hosts. Yours might too. That's fine, they won't hurt anything.)
Or here's an example on Google Domains:
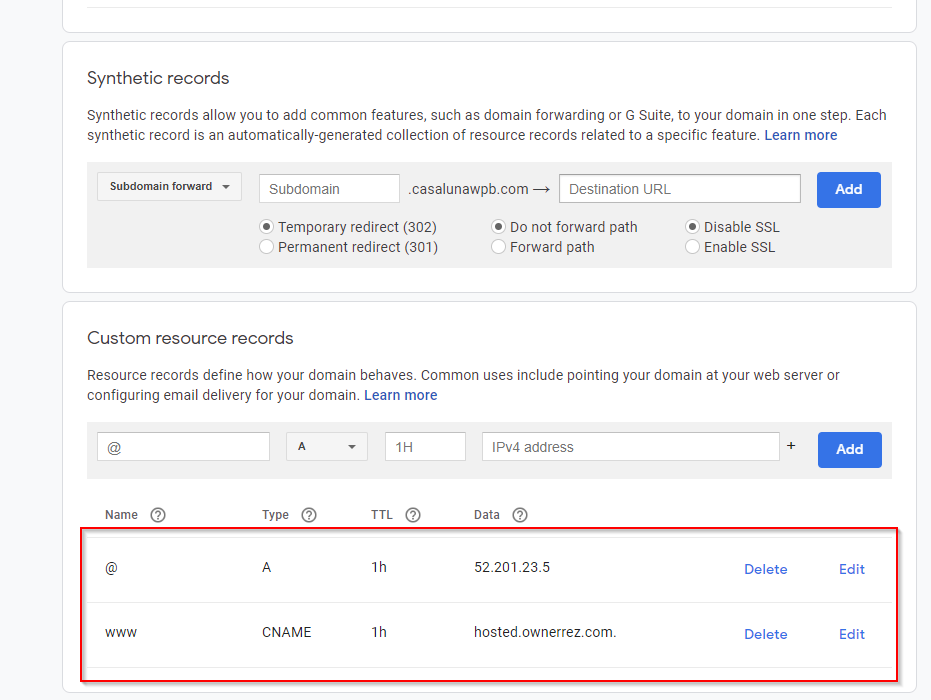
You can also do a CNAME on the @ record, but that can conflict with email servers. That would look something like this:
Confirmation
Once the configurations are in place, you can double-check that everything is correct using the Dig tool.
If you run into any issues setting up the site, or with the go-live configuration in general, contact us and we'll help you get it all set up and configured properly. This will almost certainly involve your domain registrar, though, so we recommend you contact them first to exhaust their ability to assist, since they can see your configuration screens firsthand.