
A large update went out yesterday afternoon, and I wanted to drop a quick note about some of the major changes that were part of that release.
Security Deposits now automatically release in [x] days
For many years, users have been asking for this and we finally got around to it. Instead of being emailed every day endlessly, the system will now automatically release security deposits based on your settings.
You are still reminded - once after departure and then again the day before release - that the release will happen, but there's nothing you need to do in order for the release to happen. If you take a look at your property rules, you'll notice that the security deposit rules have changed a bit.

The Release Days field is still there but now it's the number of days after departure when the system will auto-release instead of the system just emailing you. We updated the Release Days setting for all properties, system wide, to be 7 more than what was there so that you have plenty of time to adjust it before your first set of open security deposits are automatically released.
You can turn off the Release Reminder email if you don't want to get anything, and you can select the type of email template the guest should get when the auto release happens - system default, nothing or a custom template.
If you want to extend the time period for a particular booking, holding onto the funds a bit longer, you can do that too. Go to the open security deposit and you'll see an "Extend" button that you can use to push back the release period. The Extend button only shows if it's 7 days or less until the security deposit is going to be released.

We have a lot more work to do with security deposits - like adding refundable deposits instead of only holds - but we are excited about this update and believe that it will help users a lot with their post-departure workflow.
Menu customization for Hosted Websites
This is another frequently-requested update. You can now customize the menu bar on your Hosted Website to nest menu options inside other menus, easily indent and re-order and create menus that link to other pages or websites.
Let's start with the easy one. Instead of having to type in a numeric order on every page to change the order of the menu, there is now a special Menu Layout button above the list of pages:
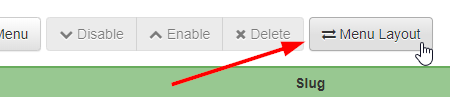
Clicking that will take you to a drag/drop page showing the current list of menus in order and showing their indent level.

To change the order of the menus, click on an item and drag it up or down in the list. You can also do this on touch devices, such as mobile phones or tablets, by long pressing on an item for a second until you see it move and then dragging your finger up or down in the list.
Clicking the little indent button will move the page under a parent menu if that is available for that particular page. You can only have one indent level - that is, each menu can only have one menu inside it. We do not support multi-level menus.
It's important to understand that "pages" are now different than "menus". Previously, the menu bar just showed pages. Now, you can create menus independent of pages. Each page has a setting for it's Parent Menu. If you want the page to be the menu itself, select "Main Menu" as the menu. If you want the page to be underneath (or inside of) a different menu, you would select that other menu as the page's parent menu.
Menus can be clickable, linking to a page on the site or some other page on a different site (ie. a URL that you enter), or they can have a list of items inside them. If they only have a list of items inside them, when you click the menu, it opens to show what's inside without redirecting away.
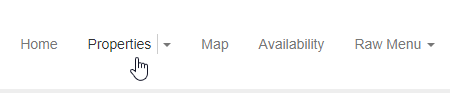
In the picture below, the "Raw Menu" menu is an example of a menu that only has a list of items inside it. It opens when clicked to show those items.

In the picture below, the "Properties" menu is an example of a menu that is both clickable and has a list of items. Clicking on the word "Properties" directly will redirect away, while clicking on the caret to the right will open its menu of items.
Play with the menus and let us know what questions you have! This should solve a lot of problems that users have had with nesting items and being able to link away to other sites.
Manual Mode for Channel Bridge bookings
Another user-requested enhancement was to make it so that charges can be edited for Channel Bridge bookings.
Previously, when Channel Bridge imported the charges for a booking, those charges were not editable. We did this on purpose so that we could separate and keep track of the charges from the channel versus the ones you add yourself.
However, there are many times when you need to change the charges from the channel because of things like channel errors, bad imports or special situations that Channel Bridge doesn't translate correctly.
To solve this, we have added a "Manual Mode" button that will put the booking into a mode where you can:
a) edit the charges directly
b) make sure that future Channel Bridge imports do not overwrite your changes
To find the button, go to a booking's charges and click Change. You'll now see a little button above the charges for Manual Mode.
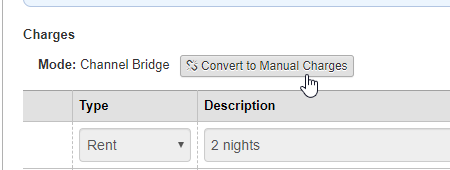
Follow the prompts and warnings and then you'll be able to edit the charges.
Please be aware that once you go manual mode, there is no way to go back to Channel Bridge mode for the booking. You are responsible, from that point forward, to keep the booking's charges up to date. Payments, refunds and fees will still continue to be imported via Channel Bridge, but the charges will remain in manual mode.
That's it for now! Lots of other minor things were fixed or updated, but these are the big three.